Oil and Gas Well Drilling and Servicing eTool
Drilling » Tripping Out/In
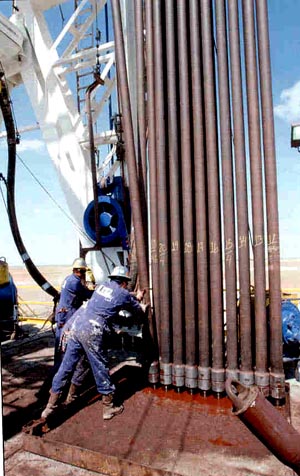
Tripping refers to the process of removing and/or replacing pipe from the well when it is necessary to change the bit or other piece of the drill string, or when preparing to run certain tests in the well bore.
The activities that comprise tripping out are listed below. Tripping in essentially comprises the same steps in reverse order.
Tripping Out
Tripping In
- Elevators raised
- Tripping In -- latching elevators to top of stand
- Moving pipe to rotary
- Pipe is made up
- Slips are pulled
- Slips are set
- Elevators are unlatched
- Process repeated for all stands
- Pickup kelly and attach to drill string
- Break circulation, and
- Resume drilling
Additional Information:
- Drilling Technology Series. Petroleum Extension Service (PETEX), University of Texas at Austin.
- Accident Prevention Guide. International Association of Drilling Contractors (IADC).
- RP 54, Occupational Safety for Oil and Gas Well Drilling and Servicing Operations. American Petroleum Institute (API), (March 2007).
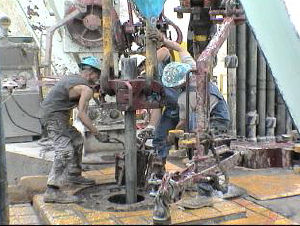
The floor crew sets slips around the drill stem.
Potential Hazards
- Getting fingers or other body parts pinched between slips or slip handles and rotary table.
- Receiving muscle strain from improper lifting technique.
Possible Solutions
- Use proper hand placement when setting slips.
- Use proper stance and slip lifting techniques. Slips have three handles and should be lifted jointly by more than one person.
Additional Information
- Drilling Technology Series. Petroleum Extension Service (PETEX), University of Texas at Austin.
- Accident Prevention Guide. International Association of Drilling Contractors (IADC).
- RP 54, Occupational Safety for Oil and Gas Well Drilling and Servicing Operations. American Petroleum Institute (API), (March 2007). Includes procedures for promotion and maintenance of safe working conditions for employees engaged in rotary drilling operations and well servicing operations, including special services. Applies to rotary drilling rigs, well servicing rigs, and special services as they relate to operations on locations.
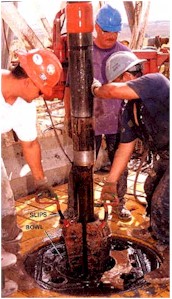
#52. Slips
Wedge-shaped pieces of metal with teeth or other gripping elements that are used to prevent pipe from slipping down into the hole or to hold pipe in place. Rotary slips fit around the drill pipe and wedge against the master bushing to support the pipe. Power slips are pneumatically or hydraulically actuated devices that allow the crew to dispense with the manual handling of slips when making a connection. Packers and other down hole equipment are secured in position by slips that engage the pipe by action directed at the surface.†
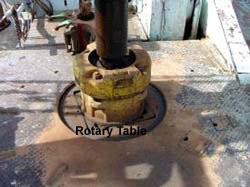
#51. Rotary Table
The principal component of a rotary, or rotary machine, used to turn the drill stem and support the drilling assembly. It has a beveled gear arrangement to create the rotational motion and an opening into which bushings are fitted to drive and support the drilling assembly.
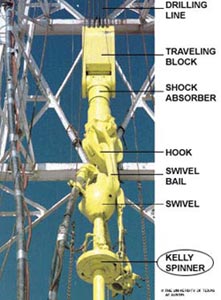
Note the pipe spinner (in red) on the side of the swivel.†
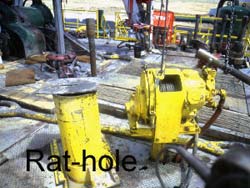
Breakout the kelly and set it into the rathole.
Potential Hazard
- Release of excess drilling mud resulting in skin contact, loss of footing, etc.
Possible Solutions
- Shut down the mud pumps before breaking out the kelly.
- Close the mud saver valve on the kelly (if present).
- Use a mud bucket to divert flow of excess mud.
Potential Hazard
- Being struck by the slip handles if the rotary table is used to spin the drill string.
Possible Solutions
- Stand clear of the rotary table when it is rotating.
- Consider other technologies (such as a pipe spinner, kelly spinner, or top drive unit) to eliminate this hazard.
Potential Hazard
- Being struck by the kelly if the pullback line unhooks when kelly is being pulled toward the rathole.
Possible Solutions
- Implement an effective pullback line attachment procedure.
- Ensure workers stand in a safe location away from the pullback line and rathole during this pullback operation.
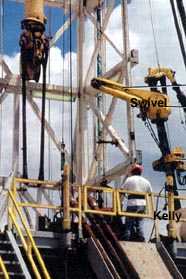
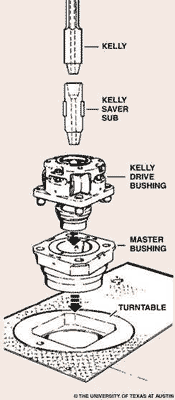
#43. Kelly
The heavy square or hexagonal steel member suspended from the swivel through the rotary table. It is connected to the topmost joint of drill pipe to turn the drill stem as the rotary table turns.†

#49. Rathole
A hole in the rig floor 30 to 35 feet deep, lined with casing that projects above the floor. The kelly is placed in the rathole when hoisting operations are in progress.†
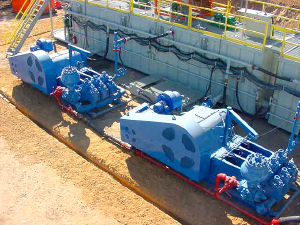
#16. Mud Pump
A large reciprocating pump used to circulate the mud (drilling fluid) on a drilling rig.†
#45. Kelly Spinner
A device for spinning the drill pipe. Replaces the spinning chain.†
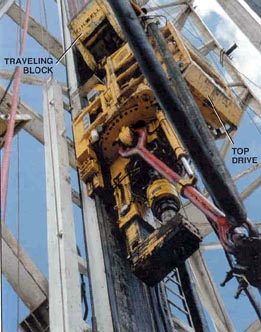
#6. Top Drive
The top drive rotates the drill string end bit without the use of a kelly and rotary table. The top drive is operated from a control console on the rig floor.†

The crew attaches elevators to the elevator links.
Potential Hazards
- Being pinched by the elevator links while attaching elevators (or attaching elevator links to the hook).
- Being struck by the elevators.
- Receiving strains and sprains.
Possible Solutions
- Use proper hand placement when attaching elevator links.
- Ensure workers stand away from swing-path of the elevators and elevator links.
- Use lifting equipment and limit manual positioning of elevators.
- Use proper mounting procedures.
#40. Elevators
A set of clamps that grips a stand, or column, of casing, tubing, drill pipe, or sucker rods, so the stand can be raised or lowered into the hole.†
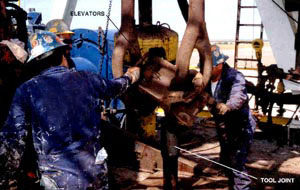

The floor crew latches the elevators onto the pipe.
Potential Hazards
- Getting hands or fingers pinched in elevators.
- Being struck by elevators not securely latched.
- Getting hands or fingers caught between elevators and stump.
Possible Solutions
- Ensure workers are instructed in proper latching procedure, including the use of handles on elevators as they are descending into place over the stump or tool joint.
- Inspect and maintain elevators.
Additional Information
- RP 8B, Inspection, Maintenance, Repair, and Remanufacture of Hoisting Equipment. American Petroleum Institute (API), (April 2005). Covers such items as crown-block sheaves and bearings, drilling hooks, elevator links, rotary swivels, dead-line tie-down/wireline anchors, and safety clamps. This edition of API RP 8B is an identical adoption of ISO 13534:2000.


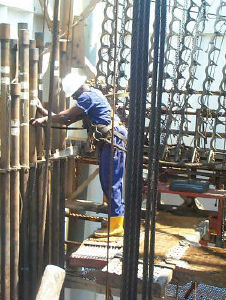
The derrickman climbs up the derrick to the monkeyboard. From here he unlatches the elevators and guides the stands of pipe into the fingerboard. The elevators are then lowered and attached to the next stand of pipe.
Potential Hazards
- Falling while climbing up or down the ladder.
- Falling from monkeyboard or fingerboard.
- Slips, trips, and falls.
- Falling during an emergency descent.
Possible Solutions
- Use climb assist device.
- Wear appropriate fall protection including a full body harness. For Fall Protection guidance, consult:
- 29 CFR 1910.28, Duty to have fall protection and falling object protection.
- 29 CFR 1910.66 App (C), Fall Protection guidelines.
- 29 CFR 1910 Subpart D, Walking-Working Surfaces.
- Wear appropriate personal protective equipment such as:
- Hard hat
- Work gloves
- Safety-toed footwear
- Practice 100% tie-off while working in the derrick.
- Use slip-resistant coatings or materials on working surfaces.
- Train personnel in use of emergency escape device.
Potential Hazards
- Being caught between pipe and other objects.
- Receiving strains and sprains.
Possible Solution
- Practice proper hand placement and use of pullback (tail) ropes.
Potential Hazard
- Being struck by dropped objects.
Possible Solutions
- Implement a dropped objects program, such as tie-off for all tools.
- Use extra caution while personnel are working overhead.
- Do not carry tools while climbing the derrick ladder. Raise tools with a line to any worker above the derrick floor.
Additional Information
- Fall Protection
- Z359.1. American National Standards Institute (ANSI).
- Construction. OSHA eTool.
- Personal Fall Arrest Systems. (Please recognize that there is a weight limit, including equipment.)
Fall Protection Guidance . International Association of Drilling Contractors (IADC).
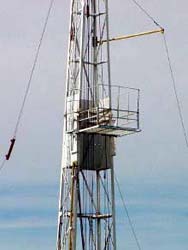
#4. Monkeyboard
The derrickman's working platform. Double board, tribble board, fourable board; a monkey board located at a height in the derrick or mast equal to two, three, or four lengths of pipe respectively.†

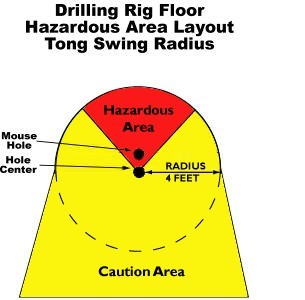
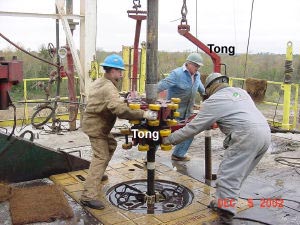
The crew uses the tongs and cathead to breakout the pipe. The rotary table may be used to spin out the pipe after breaking the connection.
Potential Hazards
- Being struck by swinging tongs if they break free from the pipe.
- Being struck by the slip handles if the rotary table is used to spin the drill string.
- Being struck by reverse backlash of tongs (backbiting) during breakout operations.
- Being struck by the tongs if a snub line breaks or the tongs come unlatched.
Possible Solutions
- Implement an effective breakout pipe procedure:
- Personnel other than tong operators stand outside the tong swing radius when breaking pipe.
- No one should stand in the red zone. (see Figure 10)
- Use proper tong latching techniques and use proper hand and finger placement on tong handles.
- Stand clear of the rotary table when it is rotating.
- Use special operational procedures when making high torque connections.
- Inspect tong dies and snub lines each tour.
- Maintain good communication between floor hands and driller.
#59. Tongs
The large wrenches used for turning when making up or breaking out drill pipe, casing, tubing, or other pipe; variously called casing tongs, rotary tongs, and so forth according to the specific use. Power tongs are pneumatically or hydraulically operated tools that spin the pipe up and, in some instances, apply the final makeup torque.†
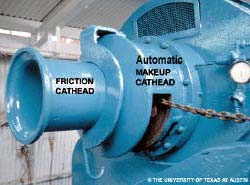
#29. Cathead
A spool-shaped attachment on a winch around which rope for hoisting and pulling is wound.†

The stand is raised and maneuvered to the pipe racking area.
Potential Hazards
- Getting hands and fingers pinched between stands of pipe.
- Getting feet or toes crushed or amputated under a stand of pipe.
- Slips, trips, and falls.
- Receiving strains and sprains.
Possible Solutions
- Keep hands and fingers from between pipe stands.
- Position feet away from the bottom of the pipe stands.
- See General Safety and Health.

The derrickman latches the elevators onto the pipe from the monkeyboard.
Potential Hazards
- Getting hands or fingers pinched in elevators.
- Being struck by elevators not securely latched.
- Getting hands or fingers caught between elevators and stump.
Possible Solutions
- Ensure workers are instructed in proper latching procedure.
- Inspect and maintain elevators.


